7 Comments

Guo Kui - 锅盔

I am obsessed with Chinese food. Especially “real” (authentic) Chinese food. Not that I don’t love the Americanized Chinese food, fried and covered in globby sauces bragging neon colors not found in nature. Come on, admit it, you like it. You don’t want to admit it, but you do. My friend Henry says, “Even bad Chinese food is better than no Chinese food at all.”  I completely agree.

I’ve spent quite a bit of time in China over the years thanks to a job that has enabled me to manage business relationships in Southeast Asia. Of all the places I’ve been lucky enough to experience, China is the place that feeds my passion. I love visiting the big cities like Shanghai and Beijing. Seeing the Great Wall for the first time, shopping in the food and hawker markets, trying to bargain for the perfect souvenirs to take home—all of these are so different than what I had in my mind as my “normal.” I just couldn’t get enough. Getting outside of those cities to see daily life in more rural areas is absolutely stunning.

A few years back, David and I decided to take a trip with an Australian tour company called Intrepid Travel and explore the country for a few weeks. They had tours tailored for 4-star dining and foodies all the way down to “Roughing It” packages. These packages were significantly cheaper, guaranteed you “Chinese 4-star” hotels and had a higher physical rating. We opted for this both to save money and to experience as much of the real deal as we could. We’d never done an organized tour before and feared the visual we had in our heads of blue-haired grannies with oxygen tanks being carted from tacky tourist spot to tourist spot in an air-conditioned bus. The tour was NOTHING like we expected. We had the time of our lives and made some life-long friends. In spite of the hotels being a bit rougher than we expected, they were clean. We navigated the language barrier and had a good laugh staying in places where we were forewarned about getting a call at 10:30 p.m. from downstairs asking if we wanted “special massage.” Tempting as that is for some, we passed on the opportunity to have our Happy Ending.

One of my favorite stops was Xi’an, home of the famous Terra Cotta Warriors. The warriors are magnificent, but it was the street outside the Muslim mosque area that completely grabbed my attention. This was Chinese street food unlike anything I’d ever tried: Crispy pastries filled with lamb, Sichuan peppercorns, chiles and aromatics. Mutton soup with hard crumbs of bread soaking in and absorbing all that richness. Hand-made noodles in the most aromatic and comfort-food-happy broths. I was in heaven.

This past year, I had the opportunity to return to Xi’an for a work meeting and I was determined to learn to make some of the dishes I kept talking up to my friends and the team. I arranged for us to take a private dumpling and hand-pulled noodle making lesson at our hotel with the chefs from their main restaurant. I bargained my way behind the counter of one of the street food stalls to learn to make the dish I loved.

I bought every English-translated cookbook they had at the city’s main bookstore -- and a few Sichuan and Hunan cuisine books that weren’t translated. (The advantage of having a bunch of bossy Chinese women in your life is that they’ll gladly help with translations and will even MORE gleefully tell you how and why everything you are doing with the recipe is WRONG WRONG WRONG!!!!!!!) The problem is, there aren’t many English recipes for the street food dishes I loved the most. As a matter of fact, I didn’t even know what my absolute favorite was called until I read about it in Fuchsia Dunlop’s memoir, “Shark’s Fin and Sichuan Pepper,” chronicling her time at the Sichuan Culinary Institute in Chengdu. I’m re-reading the book now, because I’m heading there in a couple of weeks for an intensive two-week cooking course at the same school.

I mentioned this dish, “Guo Kui,” to a Chinese colleague who lives in Singapore and lamented that there are no English recipes out there for the version I remembered. He offered to check some Chinese language websites and sent a few links (with pictures) to me to see whether any of them linked up with my memory of the dish. One did, so I copied the recipe and sent a plea for help to my bossy ladies. My friend Kairu offered to assist and had her mother translate the recipe for us, taking great glee when her mother asked if I knew what it meant to “fluff meat.” No, really, it’s an English translation of a real cooking technique. “Bitch, please,” I replied with an instant eye-roll. “I know how to do BOTH versions of that expression.”

Last weekend we gave it a try, made a few tweaks and came up with a version pretty identical to that which I remember. There are many versions of Guo Kui in china. Some are thicker and doughier, served as a large heavy roll to accompany dishes. Some are cut and filled with braised meats or vegetables, making a “Chinese Hamburger.” This version is the one I remember most fondly though, and is the one Fuchsia Dunlop references in her book (I checked with her on twitter and she was kind enough to confirm). TRY this dish. It’s very simple and quite delicious and I guarantee you’ve never had anything like it before.  And if you like this type of food, don’t miss the opportunity to try more authentic Chinese cuisine from Fuchsia Dunlop’s other books. They’re some of the most used and most referenced books in my collection.

锅盔 Guo Kui  

Ingredients:

Flour – 2 cups, plus more for dusting/rolling

Water – 3/4 cup (may need a little more, depending on your dough)

Lamb, ground – 1 lb.

Sichuan Peppercorn Powder – 2 tsp

Garlic – Minced - 1-2 Tbsp

Ginger, minced – 1 Tbsp

Ground cumin – 2 tsp

Dried Hunan (if you can find them) Chiles, or red chile flakes – 1 Tbsp

Chile Oil – 2 tsp

Scallions – 1 bunch, green and light green parts, thinly sliced into rings--as thinly as you can slice them.

Salt – 1 tsp

Soy Sauce – 2 Tbsp

Peanut oil, for frying and as needed

Lard (optional), as needed

Instructions:

Finely chop ground lamb with a cleaver for 5 minutes (or if grinding your own, use the finest setting and then chop with a cleaver until uniform).Add sichuan peppercorn powder (you can make this by lightly toasting sichuan peppercorns in a hot dry pan for 2-3 minutes until they pop, and blitzing in a strong blender or food processor. Strain through a fine mesh sieve to avoid the hulls) minced garlic, ginger, cumin, chiles and chile oil, scallions, salt, soy sauce and a teaspoon peanut oil to the chopped lamb.

Mix well with chopsticks, and toss meat against the side of the bowl for 2-3 minutes to “fluff” it, and create a lighter texture. (If you’re unsure how to do this, ask your mom. I can guarantee she’s a champion meat-fluffer from WAY back).

Mix flour and water in a stand mixer with a dough attachment (My lazy white man way) or mix by hand. You want the dough to come together and it should be quite soft. We used just over 3/4 cup of water for 2 cups flour. Knead until very soft and pliable. Add another tablespoon oil (or if you want to be authentic, a tablespoon of lard. Trust me--the flavor is great), knead again until the fat is incorporated into the dough, place in a bowl and cover with a warm towel. Let it rest for 30 minutes.

Knead the dough one more time, roll into a log about 2 ½ inches thick and cut into segments. The segments should be about 2 1/2-inches around and about an inch thick.

Preheat oven to 500 degrees Farenheit.

Lightly flour or oil your work surface and roll the dough into a rough rectangular or tongue shape. Brush with oil or lard and about a tablespoon of the lamb mixture. Starting at the short end, roll the dough down the length of the “tongue” until you have a small rolled bundle. Turn the bundle on its end and press it down flat. Roll into a thin pancake. (Don’t sweat it if some of the meat breaks through. You can dust with a little flour and when you cook it there will be no problem).


Heat a medium skillet over medium-high heat and once hot, add about 3 Tbsp cooking oil. Once the oil is shimmering, add the guo kui one at a time, flipping the pancake after about 2 minutes. It should be lightly golden brown on both sides. Transfer to a rack and place in oven to crisp and drain for 3-5 minutes.

Serve guo kui on its own or if you’re a chile freak like we are, with some chile oil on the side.

7 Comments

3 Comments

REC: Chinese Sizzling Cumin Lamb with Chile Pickled Long Beans

I love Chinese food. I don’t care if it’s Americanized Chinese General Tso (Hello—who doesn’t like that), fiery Hunanese cuisine (which we have to drive to Vancouver to get because there’s none to be found in Seattle), hot and numbing Sichuan fare—I love it all. The food I’ve had in China that was the most memorable, and that which I most wanted to imitate is Xinjiang style, specifically the food I’ve been lucky enough to try in Xi’an. We ate the SHIT out of that stuff.

With a strong Muslim influence, the foods in Xi’an are full of chiles, laced with Sichuan peppercorns, and you find a lot of goat and lamb. There is a street outside the mosque with the most amazing  and diverse street food I’ve ever eaten, and I looooves me some street food. I’ve been trying for years to imitate a snack I found there called Guo Kui (“Little Helmets”). A colleague forwarded me a recipe he found last week on a chinese website after listening to me bitch and moan about how there are no English recipes that seemed authentic to my taste memory of that food, and my friend Kairu pulled in her mother to help translate. Stay tuned on that one…we’re giving it a test run this weekend.

While researching Sichuan recipes in my fervor around a trip I’m taking to cook at the Sichuan Culinary Institute next month, I came across this recipe from Danny Bowien of Mission Chinese Food in San Francisco. Bowien is a rock star, and the food he puts out has a cult following. Reading the ingredients on this recipe, I had to give it a try. Let me tell you: It. Is. Spectacular. This is the flavor I remember from trips to china, and specifically the couple of times I’ve been in Xi’an. The gaminess of the lamb, a rich meaty broth, thick noodles and that gorgeous marriage of chiles, cumin, and Sichuan pepper. We went insane for this soup. You will too.

A couple of quick modifications: I added Sichuan peppercorns to this recipe, because I love their addition to this mixture and they are key to my memory of similar dishes. Second, I substituted in my favorite Udon noodles because they’re just amazingly delicious in soups. Other than that, I stuck with the program.

Oh, one more thing…the photo. I was lucky enough to spend yesterday afternoon with my friends Becky Selengut (and her disgusting “I camped all weekend with the lesberati” dirty feet) and the supremely talented photo goddess Clare Barboza. Becky and I had arranged with Clare to have a private photo lesson to teach us how to use the “big boy cameras” we bought last year. We love the photos we manage to get using these cameras, but neither of us know what the hell we’re doing. (Ok, she has more of a clue than I do, but that’s a REALLY low bar). We brought fruit, nuts and some cheeses to use as practice subject but I thought, “Fuck that…if I’m going to be with the pros, I’m bringing something I actually want to put on my blog”. I brought the soup components and Clare helped style and set up the shot, and stepped me through modifying the elements on the table and with the camera to create the darker, moodier type of photo that typically draws me in. Thank you, Clare!

Danny Bowien use lamb breast or lamb belly, sometimes even lamb ribs, but lamb shoulder works just as well. (Note from Marc: I used shank and then added the bones to the stock during the braising process to pull out every ounce of lamby goodness).

Chinese Sizzling Cumin Lamb with Chile Pickled Long Beans

4–6 SERVINGS

MODIFIED FROM RECIPE BY Danny Bowien Of Mission Chinese Food In San Francisco, Ca

Bon Appetit, MAY 2012

INGREDIENTS

LAMB

•          1 cup cumin seeds, toasted

•          1/2 cup coriander seeds, toasted

•          1/2 cup fennel seed, toasted

•          3 tablespoons kosher salt

•          1 tablespoon (packed) light brown sugar

•          3 tablespoons fish sauce (nam pla or nuoc nam)

•          1 tablespoon sesame oil (not toasted)

•          4 pounds lamb shoulder, cut into 1-inch cubes

•          1/4 cup vegetable oil

•          1 1/2 cups beer (Budweiser or any other pilsner works well)

•          4 cups beef or low-salt chicken broth

•          1 1/2 cups cola

•          1/4 cup soy sauce

•          1 yellow onion, burnt over an open flame, finely chopped

•          2 jalapeños, burnt over an open flame, finely chopped with seeds

•          2 fresh bay leaves

•          1 garlic clove, smashed

•          ¼ cup Sichuan peppercorns, lightly toasted in a hot, dry pan

ASSEMBLY

•          1/2 tablespoon olive oil plus more for brushing

•          Kosher salt

•          1 onion, thinly sliced

•          3 red jalapeños, thinly sliced with seeds

•          1 pound ramen noodles (Note from Marc: I used udon noodles)

•          1 bunch cilantro, tough stems removed

•          3 scallions, thinly sliced

•          2 tablespoons black vinegar

•          1 tablespoon toasted sesame seeds

•          1 green jalapeño, thinly sliced with seeds

•          Chili Pickled Long Beans (recipe below)

PREPARATION

LAMB

Pulse cumin, coriander, and fennel in a food processor until you have a rough grind. Combine half of spice mixture, salt, sugar, fish sauce, and sesame oil in a medium bowl; add lamb and toss to coat (reserve remaining spice mixture). Let lamb marinate at room temperature for at least 2 hours and up to 4 hours.

Heat 1/4 cup vegetable oil in a large Dutch oven or pot over medium heat. Working in batches, cook meat until brown, about 4 minutes per batch; transfer meat to a platter. Add beer; stir, scraping up browned bits from the bottom of pan. Simmer until liquid is reduced by a third, about 4 minutes. Return lamb to pot; add broth and next 7 ingredients. Bring to a simmer and cook, covered and stirring occasionally, until meat is very tender, 2–3 hours. Using a slotted spoon, transfer lamb to a baking sheet; reserve. Skim fat from braising liquid.

ASSEMBLY

Heat a griddle or large cast-iron skillet until it is very hot. Pat lamb pieces dry. Brush with oil and season with some of reserved spice mix. Working in batches, cook lamb, turning occasionally, until smoky and fragrant but not burnt, about 3 minutes per batch. Transfer lamb to a large bowl. Toss onion and red jalapeños in a bowl with 1/2 Tbsp. olive oil. Add to griddle and cook until softened and charred in spots, about 3 minutes; add to bowl with lamb.

Bring lamb braising liquid to a simmer. Add noodles, simmer until just tender, about 1 minute. Add reserved meat, onions, and jalapeños.

Combine cilantro, scallions, vinegar, sesame seeds, ane green jalapeño in a large bowl. Season to taste with some of remaining spice mix; toss to coat. Divide lamb mixture among bowls. Top with the cilantro mixture. Serve Chili Pickled Long Beans on the side.
Chili Pickled Long Beans

MAKES 1 QUART

RECIPE BY Danny Bowien Of Mission Chinese Food In San Francisco, Ca

Bon Appetit, MAY 2012

INGREDIENTS

•          1 garlic clove, minced

•          2 cups soy sauce

•          1 cup black vinegar

•          1 tablespoon fish sauce (such as nam pla or nuoc nam)

•          1 fresh red Thai chile, thinly sliced with seeds

•          1 red fresno pepper or jalapeño chile, thinly sliced with seeds

•          1 jalapeño, thinly sliced with seeds

•          1 12-ounce bunch Chinese long beans, cut into 1/4-inch rounds (4 cups)

PREPARATION

Combine garlic, soy, vinegar, fish sauce, and chiles in a large saucepan. Bring to a simmer; add long beans. Remove from heat, cover, and let cool completely.

DO AHEAD: Can be made 1 week ahead. Transfer to a container, cover, and chill.


3 Comments

4 Comments

You say tomato: Tomato Tonnato and Tomato, Fresh Fig & Blue Cheese Salad

It’s summer! Summer = Tomatoes, right? I’m one of those people who loathed the taste and texture of tomatoes as a kid (excluding ketchup and the jars of Ragu my mom served, natch). As an adult, I started liking tomatoes and over time, even loving them in some preparations.  I don't normally seek out tomato recipes specifically (unless they're written by Paul Bertolli, because his tomato recipes should be considered scripture). Occasionally, something all about the tomato will catch my eye, however. The New York Times posted a few inspiring tomato recipes this week in an article entitled, “Never Say No To A tomato Vine”, and I had to give ‘em a test drive.

Fortunately, Seattle summers are extremely hot and tomatoes are very easy to grow here. I stepped outside into the blistering sun and plucked a few precious heirloom gems off of my huge tomato vines, which were straining under the weight of their tremendous bounty.

HAHAHAHAHAHAHAHAHAHAHAHAHAHAHAHAHAHAHA.

I’m full of shit. Our summer, with a notable handful of days where the temperature got into the 90s, has sucked. Again. I could no more grow a crop of tomatoes than I could make a prize-winning cake or be a contestant on the Bachelorette (unless I was auditioning for the lead, of course). Fortunately, we have some great grocery stores who manage to pull in some beautiful product.

Here’s the dirt on the two recipes I selected: They’re not fussy. They’re not complicated. The tonnato isn’t beautiful, because my meager skills have a hard time making a tuna sauce (think classic italian Vitello Tonnato, minus the veal) look extremely appealing. I’m still posting the recipes, because both were absolutely delicious and would be the perfect light summery al fresco supper (if we ever get any summer). David liked the fig and tomato salad—I absolutely loved it. I liked the tomato tonnato—He absolutely loved it.

So give ‘em a go, and let us know which one you liked most.  And if it’s not too much trouble, can you send us some summer?

Tomato Tonnato

TOTAL TIME : 15 minutes

INGREDIENTS

                        5 tablespoons extra-virgin olive oil

                        1 three-ounce can imported tuna packed in olive oil, drained and flaked

                        1/4 cup mayonnaise

                        2 teaspoons drained capers

                        2 teaspoons fresh lemon juice

                        2 anchovy fillets, optional

                        1 fat garlic clove, smashed and peeled

                        2 tablespoons tightly packed basil leaves, more for garnish

                        2 pounds mixed tomatoes, large ones cut in slices, small ones cut in wedges

                        Coarse sea salt

                        Black pepper

                        Crusty bread, for serving.

PREPARATION


  1. In a blender, combine olive oil, tuna, mayonnaise, capers, lemon juice, anchovies, garlic and 2 tablespoons basil and purée until creamy.
  2. Lay tomatoes out on a platter and spoon sauce over the tops. Season with salt and a generous amount of pepper and garnish with basil leaves. Serve with bread.


YIELD: 6 to 8 servings.

Originally published with Never Say ‘No’ to a Tomato Vine, By MELISSA CLARK, August 3, 2012

Tomato, Fresh Fig and Blue Cheese Salad

TOTAL TIME: 20 minutes

INGREDIENTS

                        1 tablespoon balsamic vinegar

                        1/4 teaspoon fine sea salt

                        1/4 cup extra-virgin olive oil

                        3 tablespoons pine nuts

                        1 large or 2 small ripe tomatoes, about 8 ounces, thinly sliced

                        1/2 pound fresh figs, cut into quarters

                        1 ounce crumbled blue cheese, like Fourme d’Ambert, more to taste

                        1 teaspoon fresh thyme leaves

                        Black pepper.

PREPARATION


  1. In a small bowl, whisk together vinegar and salt. Whisk in oil.
  2. In a small skillet over medium-low heat, toast pine nuts, shaking the pan occasionally, until light golden, about 2 minutes.
  3. Spread tomato slices on a large plate. Scatter fig quarters and pine nuts over tomatoes. Sprinkle with cheese and thyme, drizzle with dressing and finish with pepper.


YIELD: 4 servings.

Originally published with Never Say ‘No’ to a Tomato Vine

By MELISSA CLARK, August 3, 2012


4 Comments

15 Comments

Summer Chilled Corn Soup with Pequin Chiles and Lemon Oil

We keep getting our hopes up for Summer in Seattle. A few days of 80+ degrees, followed by a few days of eternal cloud cover. Unseasonably muggy and meh weather = grumpy summer mood swings. Don't get me wrong--I love Seattle and I love that we get seasons here--I just wish summer was a bit more...summery. If you don't live in Seattle, you're probably sweltering in the heat wave nailing the rest of the country. Ok, ok...I get it. You win.

If it's hot and you're too sticky, sweaty and can't seem to dredge up some ambition to move off that chair, here's just the thing for you. What says hot summer days like corn? Add some citrusy olive oil, a little bit of chile kick and giiiiiiirl, you've got yerself some summer lovin'. 

This recipe is really simple. There aren't a million ingredients, there's no instruction set beginning with, "Day 1: Do this", and it's even vegetarian and gluten free. I know--BORING, right? Wrong. This recipe is inspired by a "Fire and Ice" recipe contest put out there by my friends at Marx Foods. They sent a variety of chile samples to contest participants with the simple instructions to create a cold dish with a fiery component brought on by the chiles. I love corn soup, and I think the chiles give it just a little more oomph.  From the varieties they sent, I chose to use the Pequin Chiles based upon the tasting notes included in te package, indicating flavors of citrus and sweetness. You can modify this recipe to your heat tolerance. Using about a quarter cup of the little dried pequins there's a nice burn in the back of your throat. I found it to be about a 4 on a 1-10 scale, but we are spice pigs...tailor it to what you like. 

The olive oil I used for this is my favorite lemon-infused olive oil made by Temecula Olive Oil company in California. Their lemon oil is called D'Luscious Lemon. I've had some lemon olive oils that taste like you're huffing your mom's Pledge. Fortunately, this isn't like that at all. This oil is very subtle, and it makes a nice counter to the heat and sweetness of the soup.

Happy Summer, everyone...and if you manage to peel yourself out of that chair and make this soup, let me know what you think.

By the way, you can vote for this recipe here.

Chilled Corn Soup with Pequin Chiles and Lemon Olive Oil

Serves 8
 
8 ears corn, shucked
4 cups whole milk + 1/2 - 1 cup for thinning after refrigeration (see note)
1/4 cup Pequin Chiles
1 cup heavy cream
Kosher salt and freshly ground black pepper
Lemon olive oil for garnish (see note)
1-2 Tbsp fresh chives
 
Cut the corn kernels from the cobs and set aside. Put the cobs in a large stockpot and add the milk and chiles. Bring to a boil over medium heat. Reduce the heat to low and simmer until reduced by two-thirds, about 20 minutes. Remove the cobs and the chiles and discard. Add the corn kernels and cream and simmer until the kernels are tender, about 5 minutes.   
 
In batches, transfer the corn mixture to a blender and puree. Strain through a fine meshed sieve into a bowl and season with salt and pepper to taste. Refrigerate until chilled, 4 to 6 hours.
Note: Depending on the starchiness of the corn, the soup may chill quite solid and require a bit more milk to thin back into a soupy consistency. Using a whisk, add milk to your chilled soup to achieve the consistency you like. Ideally, this soup comes out slightly thick like a bisque.
 
Divide among 8 small bowls and drizzle a liberal amount of lemon olive oil over each serving. Sprinkle with chives and serve.
 

15 Comments

6 Comments

The Perfect Pad Thai

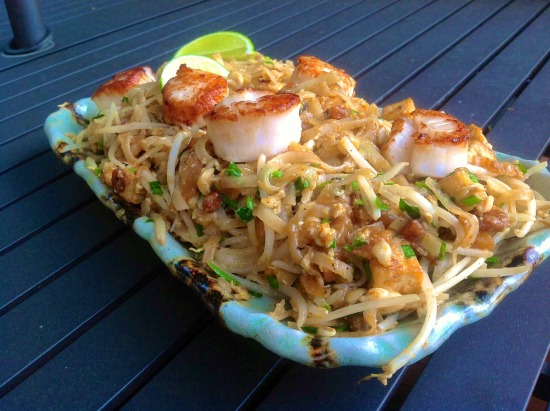
There are certain recipes I’ve spent years trying to make just…right: The perfect Bolognese (I’m about 95% of the way there), a flawless souffle (Thanks to Jerry Traunfeld, I’ve got that one down) and Pad Thai. I’ve made good Pad Thai. I’ve even made what I think is great Pad Thai. This is the recipe I think makes flawless Pad Thai. I tested it last week for David, and made it again for friends this weekend. It. Is. AWESOME.  Seriously, I think it is as good as the best Pad Thai I’ve had in any restaurant or even in Thailand.

The author of this book, is Thailand’s tv food celebrity. Born into the royal family, Chef McDang has cookbooks, tv shows, and lucrative consulting gigs for Thai food companies. His cookbook is broken out into basic Thai ingredients and dives deep into the spice pastes that form the core of Thai cooking. He discusses the regional differences and how they affect food, and then provides recipes to demonstrate the basic cooking techniques of boiling, grilling, salads, dips, stir-frying, deep-frying, steaming, curries and (my bane) desserts. In addition to the Pad Thai recipe, I’ve also made his Pad Grapao Nuea (Stir-Fried ground beef with chili, garlic and Thai holy basil) and it came out perfect. Again, as good as anything I’ve had in a restaurant or during my visits to Thailand.

A couple of notes on sourcing the ingredients: You need to have a good Asian grocery near you, or you will need to buy some of the more esoteric items (pickled turnip, pickled garlic, Thai chile sauce—not the sweet one) from internet sources. In Seattle, I found everything at Uwajimaya with the exception of the sweet pickled turnip, which I bought at Viet Wah. The base sauce recipe starts at about 6 quarts, and you reduce it down by half—it makes enough to last a while. The reduction took me a couple of hours, but then actually making the Pad Thai was an exercise of about 10 minutes. It’s well worth that initial time investment. You can use any protein in place of the shrimp. Because this was made as part of an asian meal already including a different shrimp preparation, I seared scallops instead.

If you’ve ever wanted to make Pad Thai, give this recipe a go. You won’t be disappointed. The measurements are metric, as this book was originally published in Thailand. Although a US Version has not been released, I found mine on Amazon.

Pad Thai Goong Sod

Adapted from The Principles of Thai Cookery, by Chef McDang

Serves 4

Ingredients:

60ml vegetable oil

3 cloves garlic, minced

250g prawns, peeled and cleaned (or other protein)

150g white bean curd, diced small

80g sweet pickled Chinese turnip (daikon), finely chopped

30g dried shrimp

300g dry Thai rice stick noodles (Chantaburi), soaked in cold water until strands are white, drained

230ml Pad Thai sauce (Recipe below)

2 eggs

150g bean sprouts

70g chives, cut into 1 ½ inch lengths

50g unsalted, toasted peanuts, chopped

Chili powder (for garnish), as required

4 lime wedges (for garnish)

Preparation:

  1. In a wok, heat 2 Tbsp of the oil over moderate heat. Add garlic and stir-fry until fragrant. Add prawns and stir-fry until pink but not cooked. Immediately take out of the wok and reserve.
  2. In the same wok, add a little more oil, then add white bean curd and dried shrimp. Stir-fry until bean curd browns.
  3. Add the noodles and stir-fry to soften. Add Pad Thai sauce, a little at a time. Stir-fry to mix quickly. The noodles will soften further and absorb the flavors of the sauce. Taste.
  4. If the flavors are not intense enough, add a little more sauce and allow it to seep into the noodles. Add the pickled Chinese turnip and more dried shrimp. Stir-fry to incorporate these ingredients.
  5. Move the noodles to once side of the wok. Add the cooked shrimp and a little oil to the bottom of the wok. Raise the temperature and crack the eggs into the bottom of the pan.
  6. Cover the eggs with the noodles. Reduce the heat a little and allow the eggs to cook.
  7. Toss all the noodles together to spread the eggs. Mix in the bean sprouts, the chopped Chinese chives, and peanuts.
  8. Serve the Pad Thai, garnished with fresh bean sprouts, Chinese chives, banana blossom and a lime wedge. If you like peanuts, add a few more to the side of the plate.

Pad Thai Sauce

Ingredients:

300g pickled garlic

100g fresh garlic, peeled and chopped

170g fresh Thai chile peppers

3 cups chili sauce (I used the Taste of Thai brand, but any chili sauce will work)

1 cup pickled garlic juice

1 kg palm sugar

375ml distilled vinegar

3 cups tamarind juice

3 Tbsp salt

½ cup fish sauce

3 liters water

Preparation:

  1. Place all the ingredients in a food processor and blend until smooth.
  2. Transfer the mixture to the saucepan, stir to mix well and bring the mixture to a boil.
  3. Reduce the heat and simer in order to allow the sauce to evaporate and thicken. Once the liquid is reduced almost by half and tastes sweet, sour and slightly salty, allow it to cool. Once cooled, transfer to an air-tight container and refrigerate ready for use when making Pad Thai.

Sauce will be enough for 12-15 servings.

6 Comments

12 Comments

Strawberry Shortcake Trifle

This weekend we went strawberry picking. In Seattle, thanks to Jon Rowley (the man who brought us Copper River Salmon) it’s ALL about Shuksan strawberries. They’re ripe, they’re juicy and they’re extremely perishable. When you get your hands on some, you have about 30 seconds to figure out what to do with them before they begin to spoil. They’re that ripe.

This weekend, there Jon hosted a picking event at a farm in Mt. Vernon (about an hour north of Seattle). A group of about 20 people descended on the farm at 9am, got the primer on these gems, and were all set loose to pick their own.  It was muggy (rare for Seattle), rainy (not so rare) and a muddy mess in the fields, but we were determined to find our own perfect berries. Now, as someone who loves cooking and for whom sustainability is top of mind, it is very important for me to go to farms and get closer to my food. BWAHAHAHAHAHAHAHAHA. Was that believable? Screw that pretentious blather. It was muggy and gross, and there was no cocktail service. But we had fun seeing some familiar faces, meeting some new ones, and joking about whether or not the berries would survive the hour-long drive home without turning into their own moldy ecosystem. “Oh my god, I blinked….I think it made my berries rot”!

Joking aside, it was a fun experience, and it was cool to learn about the berries, the marketing behind them, and meet the 6th generation farmer who hosted the group.

When I got home and hosed the mud off, I searched for strawberry shortcake recipes online. Fearing my baketardedness, I decided to go with Emeril’s recipe for a strawberry shortcake trifle. Trifles are delicious, and forgiving if you screw up the cake...WHICH I DIDN'T DO, for the record. The cake was delicious on its own, but adding booze to it at the end made it even better. The recipe calls for ½ cup of liqueur ala the famous 70s Jello Poke Cake. I doubled that for ours, and I think it could still take a little bit more. When in doubt, add more booze.

Yes, Kairu. I MADE the cake. From scratch. It didn’t come from Safeway. As you can tell from the photo, it was so delicious, it sparkled!

And you’re a bitch.

Strawberry Shortcake

(Adapted from Emeril Lagasse)

Ingredients

1 cup (2 sticks) unsalted butter, melted and slightly cooled, plus 2 teaspoons, softened

 6 large eggs, at room temperature

2 tablespoons milk, at room temperature

3 1/3 cups granulated sugar

2 cups all-purpose flour

2 teaspoons baking powder

1/4 teaspoon salt

3 pounds strawberries, rinsed, hulled, and sliced

1/2 cup orange-flavored liqueur, plus a little more for drizzling (recommended: Grand Marnier)

1 1/2 teaspoons orange zest

2 1/2 cups heavy cream

5 tablespoons confectioners' sugar

1 1/2 teaspoons vanilla extract

Directions

Preheat the oven to 375 degrees F and grease a 9 by 13-inch glass casserole with the 2 teaspoons of butter and set aside.

Combine the eggs and milk in a large bowl and beat with an electric mixer until frothy. Add 1 1/3 cups of the sugar and continue to beat at high speed until the mixture is quite thick and pale yellow, about 7 to 10 minutes.

Sift together the flour, baking powder, and salt in a medium bowl. Fold this mixture gently into the egg mixture. Gently stir in the melted butter and then transfer the batter to the prepared baking pan and bake in the center of the oven until risen and golden brown, about 30 minutes. Remove from the oven and let cool on a wire rack before proceeding.

Make the strawberry topping by combining the strawberries, remaining 2 cups sugar, 1/2 cup orange liqueur, and orange zest in a large bowl and tossing to combine. Let sit at room temperature for 15 minutes, stirring occasionally, until all sugar is dissolved. Refrigerate, covered, until ready to assemble the dessert.

Make the whipped cream by combining the heavy cream with the confectioners' sugar in a large bowl and beating with an electric mixer or whisk until slightly thickened. Add the vanilla and continue to beat until the mixture nearly forms stiff peaks.

When ready to assemble the dessert, poke holes all over the cake using a cake tester or toothpick. Drizzle cake with a little orange liqueur. Cut the cake into 1 1/2-inch cubes and place half of the cake cubes on the bottom of a deep-sided dessert bowl. Add half of the strawberry mixture over the top of the cake cubes, juices and all, spreading strawberries evenly with a spatula and allowing the juices to absorb into the cake. Top with the remaining cake cubes and then the remaining strawberries. Top with the whipped cream and serve immediately or refrigerate for up to 1 hour in advance before serving.

12 Comments

3 Comments

Animelle di Vitello in Agrodolce (Veal Sweetbreads with Sweet and Sour Sauce)

I love sweetbreads. They’re delicate in flavor, they’re versatile enough to fry, roast, or stuff into something else, and they’re cheap. If you can find them, that is. I’m surprised that many butchers don’t carry them, and the vendors at my favorite farmer’s market only have them a couple times per year. When I can procure them, I buy a few pounds and freeze them. I can't help it. I LOVE THEM.

Sweetbreads fall into the offal category, and no, they’re not a nice way of saying “brains”. They’re typically veal, and they can be either thymus gland or pancreas. Most of the time you’re getting thymus.  When I tell people sweetbreads are part of a menu, most of them go to brains. I did too—WHO TAUGHT US THIS???  It’s like we all have unconsciously absorbed this mass of false information that has no basis in reality. Like being a Tea Party voter.

But I digress.

I have two favorite sweetbread recipes. One is from the Chanterelle cookbook, and the sweetbreads are fried and tossed in a spicy, deep ginger and orange sauce – like an upscale General Tso’s chicken.  The one I’m sharing with you today is from (I know you’re sick of hearing me rave about this book) Giorgio Locatelli’s Made in Italy: Food and Stories.  In previous blog posts, I’ve given you Giorgio’s balls.  You’ve seen the nettle risotto, and been warned about the prick if you aren’t careful with that. I’ve told you how my friend Becky came to dinner, tweaked his recipe and had a table of guests swooning over what she could do with her fish. This time, we’re going for the throat…

Sweetbreads are a bit of a pain. First, they have to be soaked for at least 24 hours, but all you have to do there is change the water a few times. Next, you have to remove the membrane from around them. Once they’ve soaked, it’s a pretty quick process. And yeah, I know it sounds gross to cook anything involving the word “membrane”. The meat sauce that goes with this dish will become your de facto meat sauce base. I promise. It’s like a quick demi-glace, and it’s incredibly rich. You can make the veal sauce and the agrodolce a day in advance if you like, and clean the sweetbreads a couple of hours ahead. Once your guests arrive, it’s a quick process to fry these up, toss them in one sauce and top with another.

The only variation I made to this recipe was to ignore the instructions for sautéed spinach, because I find it boring. I subbed in some garlicky sauteed pea vines instead. Use whatever veg you want here. The sweetbreads are the star of the show.

My copy of this book is from the UK, so the measure here are metric. I’m entering the recipe as it is given in the book, but italicizing my variations and commentary.

Animelle di Vitello in Agrodolce (Veal Sweetbreads with Sweet and Sour Sauce)

Adapted from Giorgio Locatelli

4 handfuls of spinach

20g unsalted butter

100ml extra virgin olive oil

4 large carrots

1 garlic clove

1 bay leaf

4 veal sweetbreads, each about 120g, peeled and washed

1 tablespoon plain flour

2 tablespoons sunflower or vegetable oil

8 tablespoons Veal Sauce (recipe below)

Agrodolce di capperi (recipe below)

Salt and pepper

Preparation:

Blanch the spinach in boiling salted water for 5 seconds, refresh under cold running water, drain and squeeze out the excess water. Put into a pan with half the butter and half the olive oil.

Blanch the whole carrots for a couple of minutes in boiling salted water drain and leave to cool naturally, then cut at an angle into slices about 1cm thick.

Preheat the oven to 250 degrees Centigrade (480 Farenheit).

Crush the garlic with the back of a knife and put into a pan with the rest of the oil, the bay leaf and the sliced carrots. Place over a very low heat, cover with a lid and gently stew for about 10-12 minutes, until the carrots are soft. Take off the heat.

If the sweetbreads are still whole, gently break them apart (They will fall naturally into pieces). Season and dust with flour. Heat a large sauté pan (that will transfer to the oven), add the sunflower or vegetable oil and put in the pieces of sweetbread. Cook until golden on all sides, turn the heat down, leave for a minute, then transfer to the oven for about 3 minutes until cooked through. When they are ready, if you press them with your finger they should be springy, like a sponge cake. Or your mom’s ass.

While the sweetbreads are cooking, put the pan containing the spinach on to the heat to warm through, and season. Then put the pan containing the carrots back on the heat to warm through.

Take the sweetbreads out of the oven and let the pan cool down slightly, put it on the hob (“What the fuck is a hob”, you ask? It’s a stove top burner. Not to be confused with a hob-knocker, which is an entirely different thing. Look that one up on urban dictionary.), pour in the sauce, and heat through. Toss the sweetbreads in the sauce to coat. Take off the heat and carefully beat in the remaining butter, taking care not to smash the sweetbreads.

Spoon the spinach into the middle of your warmed plates and arrange the carrots around. Lift out the sweetbreads and spoon on top of the spinach. Then pour the veal sauce over the top. Finish with a tablespoon of agrodolce over each plate.

Basic Sauce for Meat

Makes 750ml to 1 liter

2-3 tablespoons sunflower or vegetable oil

400g meat trimmings (chicken, veal, pork, lamb, beef, venison, duck, pigeon, partridge, your neighbor’s cat, feral children,…). Note: I didn’t have meat trimmings so I just bought a cheap cut of veal on the bone. Don’t spend a lot of money on this—it’s just to caramelize and give depth of flavor.

1 carrot, diced into roughly the same size as the meat (make sure the dice are the same size so they cook evenly)

2 garlic cloves

1 sprig of rosemary

1 bay leaf

1 shallot, diced

20-30g butter

1 teaspoon flour

1 tablespoon tomato paste

1.5 liters good stock (chicken, veal, etc., depending on your meat,) For this dish, I used veal stock, but really anything will do. It’s flexible.

400 ml (A little more than half a bottle) Chianti or other red wine. Note that this is optional for the basic meat sauce described here, but for this veal sweetbread recipe it adds amazing depth of flavor.

Preparation:

Heat the pan to medium-hot, then put in the oil.

Just before it starts to smoke, put the trimmings into the pan a few at a time, making sure they all touch the bottom of the pan. Leave these to roast without touching them for 2-3 minutes, until they start to become golden underneath. Turn them until they are golden and caramelized on all sides, another 5-10 minutes.

Add the carrot, garlic and herbs, and leave to roast for another 2-3 minutes, then add the shallots and roast for another couple of minutes.

Turn down the heat, add the butter and let it foam without burning. If adding wine, add it now and let it reduce until some of the alcohol has evaporated – I let it go 10-15 minutes.

Add the flour and tomato paste, turn up the heat again, and cook for a minute or so, until the temperature of the pan has come up again.

Add the stock, scraping the bottom of the pan with a wooden spoon. Bring to the boil, skim, turn down the heat and cook for about half an hour.  

Put through a fine sieve and reduce until you have a sauce consistency.  I let this baby simmer and reduce for about 2 hours until it was a thick, deep, decadent sauce

Agrodolce di Capperi (Caper Sweet and Sour Sauce)

5 tablespoons white wine vinegar

70g caster sugar

100g capers in brine, drained, washed and dried

100ml extra virgin olive oil

Preparation:

Make the agrodolce sauce by putting the vinegar and sugar in a small pan and letting it bubble up and reduce to a clear syrup.

Hand-blend the capers, very slowly, adding the syrup (as if making a mayonnaise), then blend in the oil (again very slowly, so that the sauce doesn’t split) until creamy. Transfer to a small pan and keep on a very low heat, without boiling, for about 15-20 minutes, until any excess liquid disappears and the sauce is very thick. Leave to cool.

3 Comments

7 Comments

Croxetti al Sugo D’Anatra (Croxetti Pasta with Duck Sugo

Ok, first of all let me get this part out of the way. The reason I’m posting a big savory pasta recipe the first day of summer (instead of the first day of Fall) is this: We just got back from three weeks in Italy.  I know, I hate me too…but understand, we’ve been planning this trip, putting it aside for other (also cool, but not Italy) vacations, and then planning it again. We shelved it again last year the NIGHT before we were to leave, due to a doggie cancer scare and 19 weeks of chemo (she reacted well to the treatment and is still doing ok), and then patiently planned it again. Did I mention we've been doing this for for ten years? Ten. Fucking. Years.

So by the time we finally went, we did it up right. Two Michelin 3-Stars and a host of little mama and papa-owned restaurants, each with a handful of tables. We played in the north and spent more time in the South, seeing the requisite museums, ruins, and scenery that just didn’t seem real. The Michelin over-the-top restaurants made us swoon. So did the inexpensive trattorias. Equal swoonage, different experiences.

Our favorite small, local find was Vini e Vecchi Sapori in Florence. I had made reservations in advance through our hotel, because the Trip Advisor reviews on this restaurant gushed about how amazing it was, and they warned there were only 6-8 tables and that it filled up quickly. We were planning to meet some friends with whom I’d reconnected (after 20 years) through Twitter, since they were going to be in town at the same time. We had a complete blast. The place filled up quickly, the waiter (the owners’ son) came out and explained the menu to us in English, and we ordered as much as we thought we could handle. And then more. With four of us, all connected by food and snark, it was easy. We took a lot of pictures of the food, because when you’re on vacation, if you don’t…you won't remember what you had, or what the nuances were. Fortunately, there’s an app on the ipad which allows you to write on photos (DrawCast), so I could scrawl notes to myself.

There were two dishes that night that especially blew me away. Everything was good. Everything. But the osso bucco was the best I’ve ever tasted, and they did a duck sauce with pappardelle I knew I’d never stop thinking about.  Armed with a lot of red wine, I asked the waiter if there was any chance the chef would share the recipe. “Of COURSE”, he replied.

Mama had come out of the kitchen (reluctantly) earlier in the evening when someone wanted to take a photo. She was obviously uncomfortable with doing that. We could tell she was shy. Not so much when it came to talking about food. She came out, we went on and on about how amazing that duck sauce was, and she started explaining what she had done (in Italian). She lit up while talking about the food. Her son tried to translate as quickly as possible. I typed notes into my iPad as fast as I could while our friends Rob and Michelle recorded her instructions on their phone. The recipe wasn’t fussy or complicated. Just delicious. I’ll tell you how to make the sauce, but first there’s one more part of the story to tell: The Pasta.

The biggest highlight of our time in Florence was meeting up with my friend Judy Witts Francini. I met Judy when she came to Seattle in person a couple of years ago to give an Italian cooking class, but had been following her on Twitter for some time as well, and was an avid follower of her blog for years before that. (Her blog was where I learned how to make one of my favorite italian condiments, Mostarda. That’s worth its own blog post, though, because it took me four damned years to get my hands on the right mustard oil to make it and it’s a pain in the ass.) Judy was very generous with her time, took us out to Chianti to meet Dario Cecchini, who I’d read about and who was on my bucket list, and showed us all over the markets in Florence. Judy knows EVERYONE in town. There’s their regular prices for tourists, and then there’s “Judy-Price”.  We stopped at one shop for prosecco and little black truffle sandwiches, went to another for some local pastries, stopped to meet one of her friends who sold us incredible olive oil and aged balsamico, then to the butcher to see all the things they do with wild boar. Then there was the big market with the hottest Italian butchers you’ve ever seen. Hot men working with big meat. Pinch me.

Heyyyyyyy, Papi.....


One of our stops was to a specialty kitchen store, where Judy promised me I could find croxetti stamps. These pasta stamps are native to Liguria and if you’re lucky enough to go there, you can have them hand-carved to your specifications. In this shop there were a few different pre-made decorations available, so I chose one with a fleur de lis on one side, and a spiral on the other. Basically, you roll out fresh pasta dough, cut out circles with one side of stamp, and press them on the other side such that the design goes into the dough. This seemed to be the perfect accompaniment to the pasta sauce mama told me how to make.

Now, because the sauce was a translation and she was speaking in very broad terms, mine will likely not be the exact dish we had in Italy. This in mind, the dish I tried to recreate for us was delicious and to my taste-memory of that night, was very close. This is one of those recipes meant to be shared, so here you go. I’ve paired it with the croxetti but any pasta will do.

This recipe was my favorite rustic dish we tried on our trip. Next time, I’ll share the recipe for my favorite three-star dish. Thank god for chefs who share!

Croxetti al Sugo D’Anatra

(Croxetti with Duck Sugo)

For the pasta:

2 cups 00 flour

2 large duck eggs + 1 duck egg yolk

Salt (just a pinch)

2 Tbsp Olive oil

For the duck sauce:

1 young duck (Wild, if you can get one), cut into pieces

¼ cup duck fat or olive oil

1 celery rib, diced

1 carrot, diced

1 medium onion, diced

¼ lb. prosciutto, diced

Salt and pepper

Sage, chopped (I used two bunches—probably about 18 leaves)

1 bottle Red Wine

Fresh tomato puree in season, or 1 28-oz can pureed Italian tomatoes

Making the pasta:

I cheat with the kitchen aid when I make pasta. Pour the flour into the work bowl, put the eggs, oil and salt in a little well in the center, attach the dough hook and let it go until it forms a slightly soft, pliable mound of dough. You might need to add some water if it isn’t coming together, but don’t add too much or you will have to flour the shit out of your dough when you roll it through a pasta machine. Let it rest in the fridge for 30 minutes or so and then roll it out using whatever pasta maker you use. I use the kitchen aid attachment for lasagna sheets for this one.

To make croxetti, put the pasta through your machine until it’s about the same thickness as a lasagna dough. (I tried rolling this down to setting 4 on the kitchen aid attachment, which was too thin and it wouldn’t hold the stamp pattern.  Setting 6 was too thick, and made too much bite on the finished pasta. Call me Goldilocks…I finally settled onto setting 5 which was just right. I’d guess it was about 1/8” thick).

Stamping Croxetti:

Using a corzetti stamp, cut out pasta coins and imprint with the stamp Place coins on lightly floured, parchment or clean towel-lined trays. Cover coins with a clean dry towel as you work with the rest.


To make the duck sauce:

Clean the duck, putting aside the heart, gizzard and liver.

Heat duck fat or olive oil in a hot pan and brown the duck for a few minutes, turning to ensure a good sear on each piece. Remove from the pan and set aside. Add celery, carrot, onion, prosciutto and the reserved duck offal. Sautee this mixture until the onion is translucent and the prosciutto slightly browned.

Add the wine to the pan and reduce by about 1/3. Add the tomato sauce and place the duck back into the mixture. The wine/tomato mixture should just about cover the duck pieces. If it doesn’t, add a bit more wine or chicken stock.

Simmer the duck, covered, for about 2 hours or until the meat is tender and ready to fall off the bone. Remove from heat. Once cool enough to handle, remove the duck meat from the bone and add back into the sauce. Add the sage, and salt and pepper to taste. There should be enough acid in the sauce from the wine and tomatoes, but tweak with additional tomato sauce as you see fit. The sauce should have a bite of gaminess from the duck, a very rich flavor from the long cook time, and a herby note on the front of your tongue from the sage. It should also be fairly thick by this point. If not, reduce it down a bit more, uncovered.

To serve, drop the croxetti into boiling, salted water and cook 3-4 minutes until tender. Drain and toss with duck sauce and top with grated fresh pecorino-romano or your favorite parmesan.

You will eat the shit out of this dish.

7 Comments

6 Comments

First Base Taquitos

“Tongue? GROSS!”

Seriously, this is the reaction some of my friends had when I told them what I was making this weekend. These are people who consider themselves very sophisticated eaters, game for anything. Seriously? Tongue is your line in the sand? Please—I know all of you and I KNOW you’ve had worse things in your mouth. I remember some of the trolls you used to date. Do you?

Besides, tongue is only first base. Wait'll you try my Home Run Sticky Buns.

We just got back to Seattle after a long, indulgent, much-needed vacation.  It was one of those great trips where we both had enough time to recharge our batteries and regain much-needed perspective, away from the daily stresses and frenzy of our lives. I managed to hold onto that vacation glow for about four days. After that, it was back into the whirlwind of work, friends and a catering gig I’d agreed to do months ago. Jetlag, meet two days of cooking.

Our clients wanted Mexican. We did this for them last year, and it was a success. The problem is, my catering partner and I do this as a hobby thing because it’s fun. We’ve both got some restaurant experience, we’re both good home cooks, and we’ve both graduated from culinary school…but we both have day jobs. Cooking is our passion. Catering is a fun thing to do every now and then to remind us why we’re home cooks and not professionals. "Ow, my feet! What do you mean we have to do our own dishes? Get your fat ass out of my counter space". Although we have a blast trashing a kitchen and each other for two days, it really is a lot of work. If you’re not a pro and try to do this, you probably end up like we do: Enjoying yourself but spending too much of your budget on (retail) food costs, making too much quantity, and doing too many complicated, expensive dishes like you would serve at home. Guilty, guilty annnnnnd….guilty.

All that said, we did better this time and the food rocked. At least, they acted like they were thrilled, but to be fair they had asked me to make some mean margaritas and they were REALLY mean. Abusive. My margaritas were hitters, and our diners were drunk.

We still made too much. We still spent too much on it. We could probably be more efficient. But that shit was delicious.

Back to the tongue—One of my favorite recipes is Rick Bayless’ Beef Tongue and Chorizo Tacos. He cooked this dish as one of his challenges on Top Chef Masters during the street food challenge in the first season. As someone who likes the taste of tongue (too easy—just don’t) I had to try it. Tongue is delicious, beefy, and tender when braised or boiled long enough. Ok, maybe that last sentence doesn't make it sound appealing, but it is. Really, it is. I find it slightly sweet, which really goes with all of the other flavors going on in this dish. We were blown away the first time we tried it, and since then I’ve adapted it to make my version of taquitos for parties. The tortillas are run through some warm oil to soften them enough to be pliable for rolling ahead of time. Enough oil remains in them to crisp up nicely in a blasting hot oven without being deep fried (as taquitos often are).  It’s a nice thing to have assembled and ready to throw in the oven before people show up. It’s also fun to let your guests eat them and discover how good they are before you tell them what’s inside.

By the way, this is the rest of our catering menu from the weekend. If any of the recipes look appealing, let me know and I’ll post them.

Appetizers

  • Chips, Guacamole, Pico de Gallo, Hot Chile Salsa, Mild Jalapeño Salsa
  • Beef Tongue, Potato and Chorizo Taquitos with Tomatillo Guacamole and Pickled Onions
  • Roasted Pepper Sopitos with Smokey Tomato Jalapeno Sauce 

Buffet:

  • Goat Cheese-Almond Chile Rellenos with Apricot Sauce
  • Tacos (2 types) - Al Pastor with Roasted Pineapple-Serrano Salsa, and Butternut squash with Greens and Vegetarian (snore) Mole
  • Caesar Salad
  • Mexican Rice
  • Refried Black Beans with Toasted Avocado Leaves

 Dessert:

Enjoy, and let me know if you decide to give my tongue a ride.

Beef Tongue, Chorizo and Potato Taquitos with Tomatillo Guacamole

Adapted from Rick Bayless

Makes 25 Tacos

INGREDIENTS

TAQUITOS

1 medium cow tongue, rinsed

1 pound bacon, cut into 1/2 inch pieces

1 pound white onions, diced

1 pound chorizo, casing removed

1.75 pounds creamy boiling potatoes, cut into 2 inch pieces

Queso anejo or cotija and cilantro (for garnish)

TOMATILLO GUACAMOLE

1 pound tomatillos, husked, rinsed and quartered

2 Serrano chiles, stemmed

5 avocados, flesh scooped from skins

1 bunches cilantro, chopped, plus extra for garnish

1 large white onions, finely diced

1 large red onions, thinly sliced

25 4 1/2-inch corn tortillas

DIRECTIONS

TACOS

  1. Simmer tongue in salted water until tender (typically 3-4 hours), then cool, peel and clean cartilage, chop remainder into 1/4 inch cubes.
  2. Fry bacon until crispy, remove from pan and drain. Add onions to fat and caramelize.
  3. Separately, cook chorizo until cooked through and browned.
  4. Separately boil potatoes in salted water, drain and roughly chop into small (1/4 inch) bits. Add potatoes and chorizo to onions and cook until crusty like hash browns.
  5. Separately brown tongue in a little fat until crispy. Combine with potato-chorizo mixture. Season with salt.
  6. This filling can be made a day ahead.

GUACAMOLE

  1. Puree tomatillos and Serranos, mix into avocados, along with cilantro and onions. Sprinkle with salt.
  2. Cover red onion with very cold water. Salt generously. Let stand 10 minutes and drain.
  3. Heat about ½ inch oil in a pan (only until warm. You don’t want it so hot it starts frying) and slide tortilla into oil until softened and bubbling slightly, about 20 seconds..
  4. Remove tortilla and dab one side with paper towels. Fill the dry side with some of the tongue mixture, rolling to make a cigar shape. Place on a baking sheet, seam side down.
  5. When all of your taquitos are assembled, place the baking sheet in a 425 degree oven until golden and crispy, about 15-20 minutes.
  6. Top with guacamole, onion, queso anejo or cotija and cilantro.


6 Comments

3 Comments

Ramacche (Prosciutto and Cheese Fritters)

I don’t think it’s a mystery to anyone how much of  a Giorgio Locatelli fanboy I am. Of my hoardish cookbook collection, his original book Made in Italy: Food and Stories remains my #1 desert-island book, and the one I most heartily recommend. I love how he writes. I love that the recipes are surprisingly simple for the most part, and convey restaurant-quality results while being targeted to the home cook. He has 8 pages on making the perfect risotto, and after reading it, you will never make risotto the same way again. (I wrote about his stuffed cabbage and nettle risotto last year. That nettle risotto is the first thing we make when the weeds hit the Farmers’ Market in the Spring.)

This past fall, his latest book, Made in Sicily came out. I was so anxious to get it in my greedy hands, I bribed a colleague in the UK (it was released there first) to buy it and shlep it to Spain with her, where we were meeting for a business trip. I could barely remember to greet her cordially before ripping it from her hands.

This book is brilliant.  As with his previous books, the recipes are clear, straightforward and unpretentious. He gives you enough of an overview of the region and ingredients for you to absorb some of the hows and whys behind the cuisine, and builds anticipation where you just have to try making the dish. I thought caponata was a ubiquitous Sicilian staple. I had no idea there were so many seasonal varieties (he provides recipes for 5 different variations, including a Christmas version).

The recipe I decided to try first was his recipe for Ramacche, which are prosciutto and cheese fritters. Giorgio’s balls are crispy on the outside, creamy and salty on the inside. They practically explode with flavor once you pop them into your mouth.

……

What? You guys are sick.

Ramacche

Prosciutto and Cheese Fritters

Serves 4

30g unsalted butter

a small pinch of salt

150g plain flour, plus more as needed

3 large eggs

150g prosciutto crudo, diced

100g caciocavallo or pecorino cheese, grated

2 tsp parsley and garlic*

sunflower oil for deep frying

*For the parsley and garlic, crush 1 clove garlic on a cutting board with the flat of your knife to make a paste. Add about 4 handfuls of flat leaf parsley and chop through the parsley and garlic to intermingle the flavors.

Put the butter and salt into a pan with 220ml of water and bring to the boil, then remove the pan from the heat and stir in the flour with a wooden spoon. Put the pan back on the heat and work the mixture continuously with the spoon until it comes together in a solid ball of dough. Take off the heat again and let it cool, then put the dough into a food mixer with a paddle, add the eggs one by one and mix until they are all incorporated.

Add the prosciutto, cheese and the parsley and garlic, and continue to mix. The dough will be quite soft.

Heat several centimeters of oil in a pan (make sure the oil comes no higher than a third or the way up). It should be 180 degrees Celsius (355 degrees Farenheit). If you don’t have a thermometer, test that the oil is hot enough by dropping in a little bit of the dough. If it sizzles, the dough is ready.

Moisten a dessert spoon with water, then scoop out little mounds of dough, slide them carefully into the oil and let them fry gently for about two minutes, turning them so they are golden on both sides, and reducing the heat if they start to brown too quickly. Remove the ramacche with a slotted spoon, drain on kitchen paper, and serve hot.


3 Comments

12 Comments

Chile Jam - The World's Greatest Condiment

Do you ever play the "What If" game with your friends? What if you had to lose one of your senses? Which would you give up? What if you could have passionate sex with any celebrity? Who would it be? If you could have dinner with any three famous people, dead or alive, who would they be and why? My favorite bar game called "No Option" is a riff on this game: You pick any three people in the bar, and your friends have to say who they would have sex with and why. It's called "No Option" because they can't say, "Death". You play, you answer the question and tell us WHY. Death is no option.

In my circle of food-obsessed gluttons, this game tends to quickly turn to all things culinary. If you could have only have three cookbooks, what would they be? (For me, It's Giorgio Locatelli's Made In Italy, Jerry Traunfeld's Herbfarm Cookbook, and Teage Ezard's Lotus – Asian Flavours). If you could only have one condiment for the rest of your life, what would it be?  For me, it used to be ketchup. As my palate and culinary skills grew, aioli nosed its way into the lead. Then I discovered Chile Jam. Chile Jam is a traditional thai recipe, and there are as many variations as there are for rustic curries. I've tried every chile jam recipe I can get my hands on. For my tastes none of them touch this one by Christine Manfield, an Aussie chef whose cookbooks are inspirational, inspiring and invariably put out amazing recipes that always work. (You may recognize her name, as she just won the IACP award for her newest book, Tasting India .)

Best.  Condiment.  Ever.

I’ve done in huge batches a few times. Typically, I double the recipe because it takes time, and for the investment I'd rather make a ton of it so it will last.  The first time I used serranos instead of the red birds eye chillies, because they didn’t have them at the asian market that particular day.  I also added a bit more palm sugar, which rounds out the heat more IMHO.  The second batch was with the hot thai birds eye chillies, and it is REALLY hot.  Still good, but much more punch than the first batch.  Just be forewarned.

This has depth of flavor you won't get from most condiments, because it cooks for 12 hours (sometimes I cook it up to 18 hours). The chile heat blast blends in with the sweetness of the caramelized onions and palm sugar. The tamarind adds a great tang to the mix and rounds the flavors out completely. It's a time investment, but the active time isn't too much. You just have to remember to stir it every hour or so.

I put this into any recipe calling for chile sauce, Sriracha, or just needing a kick. It's the perfect accessory for a fried egg sandwich, tossed with sautéed vegetables and one of my personal favorites — an addition to fried rice.

I've typed the recipe as it's listed in the book, which is from Australia. This is how they spell chiles down under. Don't beat me up for spelling!

If you make this, please tell me what you think. I'm certain you won't be disappointed. 

By the way, I'm curious what your favorite "What If" categories are. Share, people!

Chilli Jam:

Ingredients:

1.5 kg large red chillies, chopped

300 g red birds eye chillies, chopped

8 large brown onions, chopped

15 large garlic cloves, chopped

1 litre vegetable oil

300 ml Tamarind liquid

125 g palm sugar, divided

Blend chillies, onion, garlic and oil to a smooth paste in a food processor.  Cook paste in a wide, heave based pan over low heat until dark red – this will take up to 12 hours of continuous slow cooking and occasional stirring.  Stir in tamarind liquid and palm sugar and cook very slowly for 2 hours.  Spoon into jars, then cover with a film of oil and seal.  Refrigerate for up to 3 months.

Chile Jam ingredients at the beginning of the simmer.

Chile Jam after 12 hours, ready to put into jars.

12 Comments

3 Comments

Grilled Asparagus with Hazelnut Aioli and Pinot Noir Syrup

With the weather hitting 70-degrees this week (What? In Seattle? Are you insane?), teasing us with the summer we’re unlikely to get until the middle of July, I’m sick of this winter comfort food bullshit. I want morels, asparagus, outdoor drunken barbecues…and a pony. 

One of my favorite grill recipes (and absolutely my favorite asparagus recipe) is this one. Smoky grilled asparagus, rich and creamy hazelnut aioli and a tart, sweet pinot syrup. There are a million variations on this recipe today, but this is the one to which I always return.  

Yes, there are a couple of sub-recipes. Wah. They're EASY. Everything can be done well in advance, making this a perfect add to the menu when your drunk ass decides to go outside, take a chance on the sun sticking around for a few more minutes, and fire up the grill. (You can do it in a grill pan too, but that’s just douchey.)

You’re gonna love this one!

BTW, Thanks to Jackie Baisa for delaying the shoveling of asparagus into her yawning maw long enough to take the pretty pictures for me!

Grilled Asparagus with Hazelnut Aioli and Pinot Noir Syrup

Ingredients:

2 bunches asparagus, stems snapped to where tender and cleaned

3 Tbsp extra virgin olive oil

Kosher salt to taste

Hazelnut Aioli (recipe follows)

Pinot Noir Syrup (recipe follows)

Preparation:

Toss asparagus in olive oil and salt to taste.  Place on well-heated grill and cook until just tender, about 3-6 minutes, depending on heat.  Place in serving bowl or individual plates.  Drizzle with Hazelnut Aioli and Pinot Noir Syrup.

For the Hazelnut Aioli:

1 shallot, minced

1 Tbsp whole grain mustard

1 Tbsp lemon juice

3 Tbsp sherry vinegar

2 oz hazelnut oil

3 oz olive oil

Salt, to taste

Hazelnuts, toasted, finely chopped, to taste

Vinaigrette will easily emulsify, so this may be made in a food processor or vigorously by hand.  Finish the sauce with finely chopped toasted hazelnuts, saving some to put over the top of asparagus when plated.

For the Pinot Noir Syrup:

1 bottle Pinot Noir, or your favorite red varietal (Note: I used my favorite local Syrah, and it was superb)

5 Tbsp sugar, preferably organic

In a heavy bottomed saucepan, melt sugar.  When sugar begins to turn golden, add wine.  Cook down on medium heat until syrupy.  This should take 10 minutes or so, depending on heat.  Turn sauce down when it begins to thicken because it goes very quickly from that point on.  Let cool and reserve.  This is good indefinitely.  Do not refrigerate.


3 Comments

7 Comments

Porchetta

Everyone has their Easter traditions. For us, it’s a Heathen Brunch with a combination of good food and questionable taste with regard to the themes surrounding the foods on the table. This year, I threw away the traditional ham idea and instead worked on making my first Porchetta. Porchetta is an Italian skin-on pork belly, generally wrapped around something else – sometimes a pork tenderloin, other times sausage or another savory filling. I was thrilled to see that Tasting Table published the Porchetta recipe from Olympic Provisions in Portland a couple of weeks ago. If you’ve never been to Olympic Provisions, you’re missing out. Their charcuterie is brilliant, and they have a small restaurant setup, where you can dive into more meat than you can possibly consume. This dish is one of my favorites from their repertoire, and it turned out great.

I made minimal substitutions and modifications to this recipe— First, I scored the skin to make it crispier.  Also, when I sliced and seared it Easter Morning, I simmered the maple syrup used for brushing with a few cinnamon sticks and some star anise to add a little more character. Finally, the belly I procured was only about 8lbs, so I didn’t bother cutting it into two roasts. Besides, with the sausage stuffing it’s a feat to roll the damned thing and I didn’t want to do it twice!

The measurements here are a combination of Imperial and metric, and it’s good to use a scale for the sausage prep.

Enjoy. This dish will send everyone running back for more.

Italian Sausage-Stuffed Porchetta

Executive Chef Erin Williams 

Olympic Provisions - Portland, Ore., USA

Yield: 20 servings

Cold water, 1 gal

Kosher salt, 1 C

Sugar, 1/2 C

Pork belly, 10- to 12-Lb  1 each

Olive oil, as needed

Italian sausage  4 Lb (Recipe Below)

Maple syrup (optional)  as needed

Sea salt as needed

Eggs, as needed

Toast, as needed

Instructions:

1. Combine water, salt and sugar. Submerge belly in brine, top with a weight so it stays submerged and refrigerate 24 hours.

2. Remove belly from brine, pat dry, then halve belly crosswise. For each porchetta roast, turn belly skin-side down. Pack 2 pounds sausage down middle of each belly half lengthwise and roll up tightly to form a log. Tie with butcher’s twine. Sear porchetta in olive oil until brown on all sides. Roast in a rotisserie or 375-degree F oven until internal temperature registers 135 degrees F, about 2 hours. Cool to room temperature and refrigerate overnight.

3. To serve, slice porchetta crosswise into 1-inch pieces. Heat olive oil in a cast-iron pan. Brown porchetta on both sides until crispy and thoroughly warmed through. Glaze with maple syrup (if using), season with sea salt, and serve with eggs and toast.


Hey, I want some!

ITALIAN SAUSAGE     

Executive Chef Erin Williams 

Olympic Provisions - Portland, Ore., USA

Yield: 2 kg

Pork shoulder, cubed, 1360 4/5 g

Pork fatback, cubed, 583 1/5 g

Sea salt, fine, 29 1/5 g

Freshly ground black pepper, 9.7 g

Fennel seed, ground, 5 4/5 g

Chili flakes, ground, 4.9 g

Garlic, minced, 3.9 g

Oregano, dried, 3.9 g

Coriander, ground, 9.7 g

Instructions:

1. Combine pork and fatback with salt and spices and marinate overnight. Grind mixture with a coarse-grind die, transfer to a mixer fitted with paddle attachment and mix for 1 to 2 minutes until mixture feels tacky. Refrigerate until needed.

7 Comments

2 Comments

Inappropriate Easter Cocktails

Every Easter I channel my frustration with my fundamentalist upbringing and ultra-conservative parochial schooling by hosting a Burn-In-Hell Easter brunch. The food is always something that redeems the theme, which might leave something to be desired with those who are devout.  Any good brunch involves good drinks, and lots of them.  A couple of years ago, when soliciting ideas from friends for the right cocktails to go with inappropriate foods like Fallen Angel hair pasta, the Cheeses of Nazareth, etc. someone showed up with the makings for Rusty Nails. What’s better for an inappropriate Easter theme than a good old-fashioned Rusty Nail or two?

For those who aren’t ready to hit the hard stuff *quite* that hard in the morning, we balance it out with Bloody Mary Magdalenes.

Try these recipes for your own party—I guarantee they will satisfy. But if you laughed at this, you’re going to hell too.

I’ll post the Easter Brunch recipes this weekend, after we get a chance to test and photograph the results.

Rusty Nails

INGREDIENTS

2 ounces Scotch

1 ounce Drambuie

INSTRUCTIONS

Pour the Scotch and Drambuie over ice in a heavy old-fashioned glass, and stir.

Bloody Mary Magdalenes

INGREDIENTS

4 cups tomato juice

Juice of 2 large lemons

3 to 4 tablespoons Worcestershire sauce

3 heaping tablespoons prepared horseradish

3 cloves garlic, passed through a garlic press

1 Tablespoon coarsely ground pepper

1 tsp hot sauce (Tabasco doesn’t pack the kick we like, so we opt for hotter sauces)

1 ½ tsp celery seeds

Unflavored vodka, to taste (for us, to taste is a LOT)

Lemon wedges, for serving

Celery sticks, pickled asparagus and hot pickled green beans for serving and munching

INSTRUCTIONS

Place tomato juice in a large container with a tight-fitting lid. Add lemon juice, Worcestershire sauce, horseradish, garlic, pepper, celery seeds, and hot sauce; shake vigorously. Taste, and adjust for seasoning; the mixture should be quite spicy.

Pour 1-2 parts vodka and 3 parts Bloody Mary mix over ice in a shaker. Shake well. Pour into glasses. Squeeze a wedge of lemon over drink (do not subsequently stir or shake drink), discard used wedge. Garnish with a large stick of celery (reserve extra stalks for munching), pickled green beans and asparagus and a large lemon wedge.

2 Comments

2 Comments

Banoffee Pie

Yesterday I joined a bunch of friends attending a dessert party. My friend who invited me extended the invitation along with instant mockery along the lines of, "We know you can't bake, so if you want to bring a savory dish, you can."  I know, right? WHAT A BITCH!

Gauntlet dropped, I considered a few REALLY fussy recipes, thinking I'd show HER.  As the date approached, the dread of baking anything that would take me hours increased so I went through my recipe file for things I know I love and that I've not made for this group of friends before. I stumbled upon a note I'd sent myself a couple of years ago when I was on business in the UK and discovered Banoffee Pie for the first time.  My friends over there were incredulous that Id never heard of it, and were smugly unsurprised when I tried it and wanted to rub it all over my body.

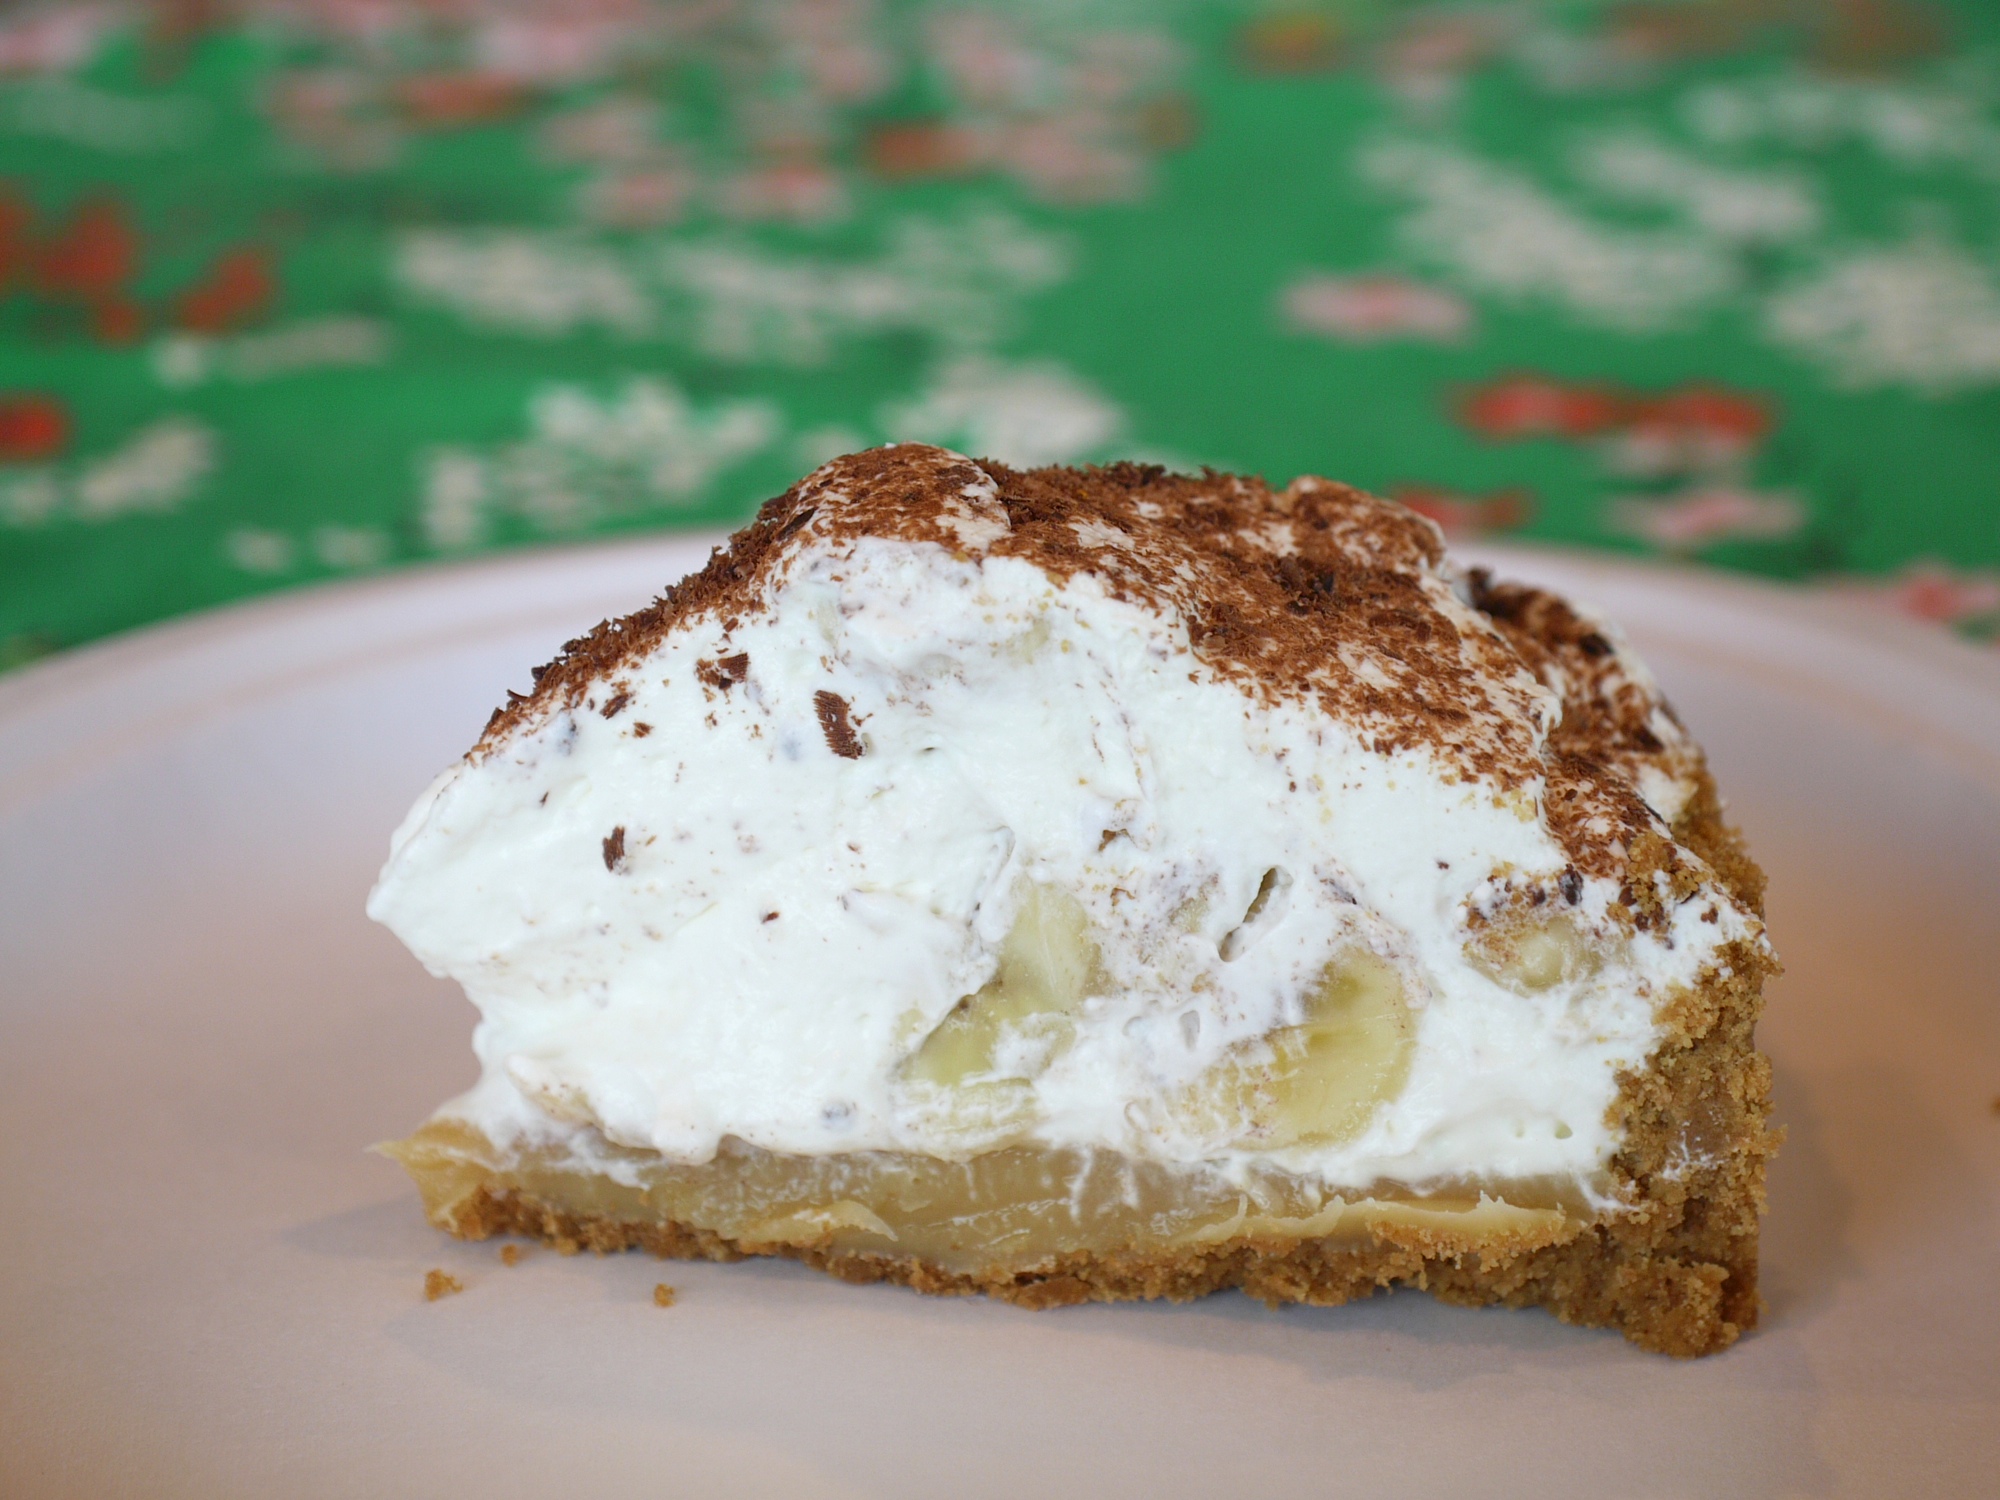
Banoffee Pie is an orgasm in a pie shell. (Yes, ladies…that means you can have 2 or 3). Graham crackery type of shell (made with Digestive Biscuits, actually), chewy toffee, whipped cream and bananas. It ended up being little fuss, other than having to plan in advance to make the pie shell the night before to allow for cooling time. (You could do it all in the same day with little effort, but my morning before the party was full. You want to allow time for the crust and toffee to cool before you add the whipped cream mixture.)

This recipe was one I found on the Today Show website when I did a Banoffee search. The only change I've incorporated is one I learned from making one of Nancy Silverton's desserts—adding crème fraiche to the whipping cream at the end. Crème fraiche stabilizes the whipped cream and adds a slight tangy note.

Hope you guys enjoy this pie as much as we did. The Baketard baked. Suck it, Kairu! (And after sucking it, please accept my thanks for the ipad photo and the photo of the completed slice.)

Banoffee Pie

Ingredients

For biscuit base

2 1/4 cups digestive biscuit crumbs (pulse biscuits in food processor)

1/2 cup melted butter

3 tbsp sugar

For toffee filling

1/2 cup melted butter

1/2 cup firmly packed brown sugar

2 tsp vanilla extract

1 10 oz (300 ml) can sweetened condensed milk

Banana cream topping

2 cups whipping cream

7.5oz Crème Fraiche

3 tbsp icing sugar

1 tsp vanilla extract

4 ripe bananas, sliced

Preparation

For biscuit base:
Mix together ingredients for the biscuit base. Press into the bottom and sides of a lightly greased 9 inch springform pan, about an inch and a half up the sides of the pan will do. Bake in a preheated 350 degree F oven for 10 -12 minutes. Remove from oven and cool in the pan on a wire rack.

For toffee filling:
In a small saucepan combine melted butter, brown sugar and vanilla extract. Bring to a slow boil until foamy, then add condensed milk. Bring back to a slow boil over medium low heat. and cook stirring continuously for another 3 or 4 minutes until the mixture darkens slightly. Remove from heat and pour into the prepared cookie crumb crust. Chill for 2 hours or more until thoroughly cooled.

For banana cream topping:
Add whipping cream, icing sugar and vanilla extract to the bowl of an electric mixer. Beat together until soft peaks form, then whip in crème fraiche. Once incorporated, gently fold in bananas.

Spread the banana cream topping over the toffee filling and garnish the top of the pie with chocolate shavings if desired. Chill for about another hour before serving.


2 Comments

3 Comments

Braised Lamb Cheek Vol Au Vents with Creamed Mustard Greens and Gremolata

Mary had a little lamb. It was DELICIOUS

I’ve been going through my recipe files and trying to organize them into a cookbook for the iPad so that I have easy, portable access when I want to find something. This is all for my personal use, because most of my go-tos are recipes I’ve found online over the years, created by someone else and thrown into an email folder, never again to see the light of day. When I make a recipe and love it, it goes into a different folder and gets sent out to the recipe mailing list I’ve grown over the years. (Today, if you’re on that list, you get an update when I throw a new recipe up to Baketard, which is intended to replace that list.)

Digging through old files I found this recipe, which was one we made a while back when we had a friend coming to town. I was lucky enough to score some lamb cheeks at the farmers’ market, and this recipe was just pretty and fussy enough for me to want to give it a go. I mean, let’s be serious—who doesn’t love ANYTHING surrounded by a vol au vent of puff pastry? Looks fancy, but it is really easy to prepare. You just need to plan for some braising time.

If you can’t get lamb cheeks (and let’s be honest, they’re not easy to acquire), this recipe would also work well with shanks. The cooking time would need to be a little bit longer—just check the meat after 3 hours and see if it’s ready to fall off the bone. That’s what you’re going for here.

I’m looking forward to light, delicious spring foods soon. Right now, with our overcast skies and constant rain, I’m still craving this kind of grub.

Enjoy!

Braised Lamb Cheek Vol Au Vents with Creamed Mustard Greens and Gremolata

Adapted from a recipe by Michael Thurman, Martini House, St. Helena

Serves 6

6 4 oz. lamb cheeks

2 carrots, cut up

3 large onions, cut up

1 head garlic, minced

2 large cans chicken broth

1 bunch thyme

1 bay leaf

2 T black peppercorns

6 T whole mustard seed

Puff Pastry

Creamed Mustard Greens

4 bunches mustard greens

3 shallots thinly sliced

2 T butter

1 qt heavy cream

3 T whole grain mustard

2 T fresh ground

mustard seed

1 T fresh ground

nutmeg

salt and pepper to taste

Gremolata

1 lemon

1/4 cup finely chopped fresh parsley

3 garlic cloves, finely chopped


Lamb Cheeks

Season lamb cheeks with salt and pepper. Brown both sides on medium/high in 3 tablespoons vegetable oil. Set aside. Add 2 more tablespoons oil to pan, add vegetables, and sauté until golden brown. Transfer cheeks and vegetables to stock pot and cover with chicken broth.

Add thyme, garlic, and spices and bring to a boil. Cover with lid or foil and place in preheated 375 degree oven for 2 1/2 to 3 hours. Remove cheeks from liquid and cover with plastic; set aside. Strain liquid and discard vegetables and herbs. Reserve braising liquid.

Creamed Mustard Greens

In 2 quart saucepan sweat shallots in melted butter until translucent. Add cream and whole grain mustard. Bring to a slow simmer on medium heat (cream will scald and boil over if too hot.) Reduce cream by half; set aside and keep warm. Skim any skin that continues to form and discard.

Bring 2 gallons of salted water to a boil and add mustard greens. Cook for 1 to 2 minutes (until tender) and remove and plunge into cold water. Remove greens and

squeeze out excess water. Place in food processor and puree while slowly adding cream mixture. When desired consistency is met add nutmeg and mustard seed. Set aside.

Gremolata

Combine garlic, lemon zest, and parsley in mixing bowl. Add olive oil and salt and pepper to taste. Set aside.

Vol au Vent (Puff Pastry)

Puff Pastry sheets can be purchased in the freezer section of the grocery store. Preheat oven to 400 degrees. Allow pastry to thaw for about 20 minutes. Cut into 2-inch squares and place on heavily buttered cookie sheet. In small bowl, whisk egg and milk together. Brush egg mixture lightly over pastry squares.

Bake for 10-15 minutes or until golden brown. Once removed from oven, cut 1/2" x 1/2" in the middle of each pastry square, remove and set aside

Plating

Warm Vol au Vent in oven and place lamb cheeks in hot braising liquid until warmed through. Place pastry on middle of plate and fill with greens. Place cheek on the greens and spoon one tablespoon of gremolata on top of cheek. Garnish plate with any extra gremolata.

3 Comments

11 Comments

Giorgio Locatelli's Branzino alla Vernaccia in Crosta Di Pomodoro (Sea Bass with Tomato Crust and Vernaccia Wine)

As the two of you who read this blog know, I have a crush on Giorgio Locatelli. His cookbooks completely rock my world. Our first cookbook club we ever hosted? Locatelli. The restaurant I must visit whenever I’m lucky enough to be in London for work or pleasure? Locatelli. My go-to for amazing Italian recipes, stories and inspiration? Locatelli.

Get it?

We had friends over this weekend and made a big Italian dinner for everyone. After obligatory appetizers, we started with a nod to it being St. Patrick’s day--a Corned Beef and Cabbage Strudel with a mustard sauce. It was great, got my Irish obligation out of the way, gave us a reason to switch wines, and had everyone sated enough to provide some cooking time to finish the other plates. (Let me know if you want the recipe and I’ll post it).

My Poodle Becky came over and graciously offered to help with the fish dish. I am a pretty confident cook. But when your friend is the author of a sustainable seafood book (Good Fish: Sustainable Seafood Recipes from the Pacific Coast) AND was just nominated for an International Association of Culinary Professionals cookbook award AND you are trying a dish with fish you haven’t cooked before, you swallow your pride and cry, "uncle." Or at least whimper a bit to get the bitch to help.

Oh, and by the time we got to the fish we were about five bottles in. But I digress…

Becky rocked it. She finished filleting the fish, removed the bones and scales the fishmonger missed, and made this amazing dish while I worked on the next course. (Recipes for that to follow: gnocchi Bolognese; braised fennel with orange, sambuca and chile; and a sweet and sour eggplant dish similar to a caponata). The caramelized onion and artichoke puree is decadent, the tomato crust on the fish provides an indescribably sexy, crunchy tang, and the wine reduction provides the necessary acid. It all comes together seamlessly.

Note: The Branzino was really small so I subbed in a rockfish instead. Any firm, white fish will work but be sure to get a thick fillet so it doesnt overcook when you try to crisp the skin.

This is one of the best fish dishes I’ve ever had, and next time, I’ll do it all on my own.

Sea bass with tomato crust and Vernaccia wine

Branzino alla Vernaccia in Crosta Di Pomodoro

Serves 4

Ingredients:

2 tomatoes

3 tablespoons diced green olives

1 tablespoon sun-dried tomatoes

2 tablespoons bread crumbs

4 thick sea bass fillets(each about 7 ounces)

Juice of 1 lemon

3 tablespoons extra virgin olive oil

160 ml Vernaccia (or other spicy dry white wine)

3 tablespoons fish stock

2 tablespoons chopped parsley

salt and pepper

For the artichoke puree:

2 large globe artichokes

2 tablespoons olive oil

1 white onion (thinly sliced)

160 ml cup white wine

3 tablespoons heavy cream

3 pats of butter

Blanch the tomatoes, skin, quarter and deseed, then cut into dice about the same size as the olive dice.

Put the sun-dried tomatoes into a food processor, process them quickly, then add the bread crumbs and whiz again until the tomato is absorbed into the bread crumbs and it looks a bit like a crumble mixture. Spoon out onto a tray and flatten down. Leave in a warm place in the kitchen for an hour or so to dry out.

Preheat the oven to 200°C (390°F) and take your sea bass out of the fridge so that it can come to room temperature. Squeeze the lemon juice, put half to one side and add the rest to a bowl of water. Have this ready before you start preparing the artichokes for the puree.

To make the puree, snap off the artichoke stalks and discard them. With a small paring knife, starting at the base of each artichoke, trim off all the green leaves and put the artichoke into the bowl of water with lemon juice while you remove the leaves from the next one. Repeat with the remaining artichokes. Using the same paring knife, begin to trim away the white leaves from each artichoke until you are left only with a few tender ones surrounding the heart. Put back into the bowl of water and continue to trim the other artichokes, putting them into the water as soon as they are ready, so that they don't discolour. Cut each artichoke heart in half, scoop out the hairy chokes and discard them. Leave the remaining hearts in the bowl of water until you need them.

Heat a saucepan, add the olive oil and then the sliced onion. Cook for about 10 minutes until the onion is soft but not coloured. Thinly slice the artichoke hearts, add them to the onion and cook for another 5 minutes, the add the white wine. Allow the alcohol to evaporate completely (about 15 to 20 minutes) and then add half a pint of water. Continue to cook for another 20 minutes or so, until the artichokes are soft and all the water has disappeared — keep an eye on the pan and stir as the water evaporates, to avoid the artichokes catching fire and burning.

Transfer the contents of the pan containing the artichokes to a food processor and puree until smooth.

Put the cream in a pan and boil it to reduce it by half. Add the artichoke puree and let it cook for a few minutes. The resulting puree should be soft but firm enough for the sea bass to sit on top; if you feel that it is too wet, let it cook a little longer to dry it out. When it is ready, season to taste, cover and keep to one side.

Take an ovenproof nonstick frying pan big enough to fit all the fillets comfortably and get it hot on the burner. (If you don't have a big enough pan, you will need to cook the fillets in two batches.) Lightly season the fish on the skin side, put a tablespoon of olive oil into the pan (it will heat up instantly) and add the fillets, skin side down. As the heat goes through the fish, it will turn from translucent to white and opaque.

As soon as the fillet has turned white halfway up the fillet, turn it over (the skin should now be crisp and golden) and sprinkle with the dried breadcrumb and tomato mixture. Pour the wine into the pan (around, not over the fish) and transfer to the oven for a couple of minutes. The bread crumbs will crisp up and become darker in colour.

Take the pan from the oven and lift the fish onto a warm plate. Put the pan back on the heat, add the olives, tomatoes and fish stock, and bubble up so that it reduces by half. Then put the sea bass back into the sauce, crust upward, for a minute or so to heat through.

At the same time, put the artichoke puree back on the heat to warm through. Stir in the butter and, when the puree is hot, spoon it onto your plates and put the fish on top.

To the pan in which the fish has been cooked, add the reserved lemon juice, the rest of the olive oil and the parsley, then spoon this mixture around the fish and serve.


11 Comments

4 Comments

Orange and chocolate ricotta fritters with honey

Desserts intimidate me. With a blog called Baketard, this shouldn't be a surprise to anyone. During the summer, I make ice cream constantly. I can whip up a soufflé or throw together a silky crème brûlée with the best of them, but when it comes to baking or dough, it's hit and miss. I'm so used to cooking savory foods where you get to improvise according to your tastes, with baking I tend to breeze by steps, forget an ingredient, or be left baffled because I just don't do it often enough to understand things like what a dough should feel like when it's ready. Cooking is joy and relaxation for me. Baking is work. Because of this, I try to find recipes that tickle my brain and inspire me, push my comfort zone a little bit, but don't put me into an all-day, overwhelming project to make something like a cake that I'm unlikely to execute well.

I found this recipe at my favorite recipe website, Australian Gourmet Traveller. I've gushed about this magazine before. (I prefer it to our US cooking magazines because it never dumbs anything down for the reader, and the food coming out of Oz these days completely inspires me.) I made this last night to cap off an Italian dinner party, and we all loved it. David and I also loved it left over with our coffee this morning. I don't know WHY we can't diet around here.

The recipe calls for you to make the dough and let it sit for an hour in the refrigerator. I actually made it about 3 hours ahead and it worked just fine.  I didn't have golden caster sugar (do they even sell it in the US?) so I sent out a plea to my baking gurus on twitter, and the consensus was to blitz some demerara sugar in the food processor as a substitution. I didn't have any handy, so I blitzed some turbinado sugar (Sugar in the Raw) instead and it worked just fine.

These doughnuts didn't seem greasy, and the chocolate orange flavor came blazing through, even with the honey. Enjoy!

Orange and Chocolate Ricotta Fritters with Honey

Serves 6

225 gm ricotta, drained
30 gm dark chocolate, finely chopped
50 gm golden caster sugar
30 ml orange liqueur, such as Grand Marnier or Cointreau
egg and 1 egg yolk, lightly beaten
1 tbsp finely grated orange rind
75 gm (½ cup) plain flour
2 tsp baking powder
For deep frying:
vegetable oil

To serve:
pure icing sugar

To serve:
honey
 
1. Combine ricotta, chocolate, sugar, liqueur, egg, egg mixture and orange rind in a bowl and mix until smooth, add flour and baking powder and mix to combine. Cover in plastic wrap and refrigerate for 1 hour.
2. Heat vegetable oil in a deep saucepan or deep-fryer to 180C. Using 2 teaspoons, form ricotta mixture into rough quenelles and drop in batches into hot oil. Cook for 1-2 minutes or until golden and cooked through, remove using a slotted spoon and drain on absorbent paper. Dust heavily with icing sugar and serve hot, drizzled with honey.
  

4 Comments

9 Comments

Roasted Grape Risotto with Hazelnuts and La Tur Cheese

To say I love Holly Smith and the food she serves at Café Juanita in Kirkland would be a gross understatement. I met Holly a few years ago when a friend “bought” her at the Seattle Men’s Chorus Auction, and invited us to his home to share a multi-course, wine-paired dinner she hosted with some of her staff from the restaurant. It didn't hurt that she was totally down with our snarky banter and was willing to go with the bitchy flow in the room! The food completely blew my mind—so much that for birthdays and celebrations, when David asks, “Where would you like to go” the answer is an unwavering, “Café Juanita”. (If you go, eat her signature dish…..the rabbit will completely change your life. When in doubt, Eat The Bunny Eat The Bunny Eat The Bunny. She also makes a foie dish that will make you weep with joy).

Because I am her biggest stalker fan, I often search the net for her recipes I can try at home. I ran across this risotto recipe and made it this weekend. It Blew. Our. Minds. The sweetness of the grapes and the tangy cheese are incredible together. Don’t be daunted by trying to procure the cheese.  In Seattle, you can get it at PFI for about 10 bucks. Otherwise, if you have a good cheesemonger you should be able to hunt it down.

David proclaimed this to be the best risotto I’ve ever made at home, and I have to agree.

What’s your favorite risotto recipe?

Roasted Grape Risotto with Hazelnuts and La Tur Cheese

Recipe from Holly Smith, Chef/Owner of Cafe Juanita

Serves 6

Ingredients

Roasted Grapes:

•1 bag seedless red Grapes from California

•>1/4 cup fennel seed

•1/2 teaspoon chile flakes

•1 tablespoon thyme

•1 teaspoon salt

•1/4 cup olive oil

Directions

Mix all ingredients together. Roast at 400 degrees F until soft and caramelized golden. Take out and leave at room temperature.

Roasted Hazelnuts:

•1 cup hazelnuts roughly chopped

In a 350 degrees F degree oven, roast hazelnuts until lightly browned, for approximately 6 to 8 minutes. Let cool. Reserve for later.

Risotto:

•2 1/2 cups Carnaroli rice (Arborio is acceptable substitution)

•7 to 8 cups chicken stock (vegetable stock may be used as well)

•2 medium yellow onions, finely diced

•1 pound unsalted Plugra butter at room temperature

•8 shallots finely minced

•1/2 cup verjus

•1 1/2 wheels of La Tur Cheese

•1 cup roasted hazelnuts (recipe above)

•Roasted grapes (recipe above)

Melt 4 ounces of butter in a heavy-bottomed pan. Add diced onions and shallots and cook over medium to high heat, stirring until uniformly caramelized. While the onions are cooking, bring the stock up to a simmer in a separate pot. It is always best to add hot stock to your risotto. Add the rice to the onions and stir. Coat all kernels well. Add the verjus and stir. Add 4 cups of hot stock and stir well. Turn the heat down to medium. When the rice has absorbed most of stock, begin adding 1/2 cup more at a time. Stir every minute or two until the stock is absorbed. Continue until about 7 cups total have been added to the rice. Taste and add more stock if not cooked through. When rice is just done and still very moist, turn off the heat and let rest for 2 minutes off the burner.

Divide the remaining butter into three portions. Add one portion at a time into the risotto, beating with a wooden spoon until well incorporated. Add one-half wheel of the La Tur cheese and stir vigorously. Fold in the roasted grapes and stir gently. With the remaining wheel of the La Tur, divide into 6 sections and roll in the reserved roasted hazelnuts. Divide and plate the grape risotto onto six plates. Garnish each with hazelnut La Tur cheese.

9 Comments

6 Comments

Butterscotch Budino with Caramel Sauce and Rosemary–Pine Nut Cookies

This is one of those recipes that makes enough to serve a crowd (10 servings) but you will really want to sit in a dark corner in front of the TV with a huge spoon and eat it all yourself. I’ve made this quite a few times since buying this book, and it’s always a crowd-pleaser.  The crème fraiche / whipped cream mixture adds some nice tang to combat the sweetness of the Budino, and the creme fraiche also stabilizes the cream.

My surprise in this was in the making of the butterscotch. I know it should be self-evident from the name, but this is the first time I did a butterscotch recipe containing butter and scotch. I know, I know--I'm clearly not going to be a Rhodes Scholar any time soon.

I did not make the cookies this recipe called for because…well….that would be baking.

Enjoy!

(Thanks to Matt Wright for the photo help with this one. This is one of the recipes we photographed at his house, as he patiently tried to teach the Baketard to be less of a Photogratard.)

Butterscotch Budino with Caramel Sauce and Rosemary–Pine Nut Cookies

Recipe from Nancy Silverton’s book, Mozza

“A budino is really just a pudding. But this budino, with its deep buttery-caramel flavor and thick, velvety texture is enough to make an Italian chef’s eyes light up. Imagine what it will do for your guests!” –Nancy Silverton

Yield:10 servings

Ingredients:

Butterscotch Budino:

 1 cup plus 2 tablespoons dark brown sugar

 1/2 cup water

 1 1/2 teaspoons kosher salt

 3 cups heavy cream

 1 1/2 cups milk

 1 egg

 3 egg yolks

 5 tablespoons cornstarch

 5 tablespoons butter

 1 1/2 tablespoons dark rum or scotch

Rosemary–Pine Nut Cookies:

 3 tablespoons heavy cream

 1 tablespoon plus 1 1/2 teaspoons honey

 1 tablespoon plus 1 1/2 teaspoons sugar

 1 tablespoon plus 1 1/2 teaspoons all-purpose flour, sifted

 1/4 vanilla bean, scraped

 1 tablespoon plus 1/2 cup butter, divided

 1/2 cup pine nuts, lightly toasted

 2 sprigs of rosemary

1/4 cup plus 2 tablespoons powdered sugar

 1/2 teaspoon vanilla extract

 1/4 teaspoon kosher salt

 3/4 cup plus 2 tablespoons pastry flour

 1/4 cup cornmeal or polenta

Caramel Sauce:

 1/2 cup heavy cream

 1/8 vanilla bean, scraped

 2 tablespoons butter

 1/2 cup sugar

 2 tablespoons corn syrup

 2 tablespoons water


1/4 cup whipping cream

 3/4 cup crème fraîche

 1 1/4 teaspoons fleur de sel

Method:

To prepare the budino, combine the brown sugar, water, and salt in a large heavy-bottomed pot over medium-high heat. Cook to a smoking, dark caramel, about 10 to 12 minutes. (The sugar will smell caramelized and nutty and turn a deep brown.) Immediately whisk the cream and milk into the caramel to stop the cooking. The mixture will steam and the caramel will seize, but will become smooth again as you whisk. Bring the mixture to a boil and reduce the heat to medium.

In a medium bowl, whisk together the egg, egg yolks, and cornstarch. Temper the hot caramel cream into the egg mixture by adding a cup of caramel at a time, whisking constantly. When half the caramel is incorporated, pour the egg mixture back into the remaining caramel, and boil while whisking constantly until the custard is very thick, about 2 minutes. Remove the custard from the heat and whisk in the butter and rum. Strain the custard through a fine mesh strainer to remove any lumps and divide among ten 6-ounce ramekins. Cover with plastic wrap and chill for several hours, or up to 3 days.

To prepare the rosemary–pine nut cookies, place the cream, honey, sugar, vanilla bean seeds, and 1 tablespoon butter in a heavy-bottomed saucepan and cook over high heat, stirring only once to ensure even cooking, until the mixture reaches 230º F on a candy thermometer. Take off the heat and whisk in the all-purpose flour. Pour the mixture into a bowl and fold in the pine nuts and 1 of the rosemary sprigs. Let the mixture stand for 15 minutes. Remove and discard the rosemary sprig. (This mixture can be made in advance, and stored in the refrigerator for up to a week. Bring it to room temperature before rolling out the cookies.)

In the bowl of a stand mixer fitted with the paddle attachment, mix together the remaining 1/2 cup butter and the powdered sugar until it is creamy and smooth, scraping down the sides as needed. Add the vanilla extract and salt and mix until combined. Add the flour and polenta and mix until combined. The dough will be soft. Shape the dough into a disk and wrap the disk in plastic. Chill for at least 2 hours or overnight.

Preheat the oven to 350º F. On a well-floured surface, roll out the cookie dough to 1/8-inch thick. Cut out circles of dough using a 1 1/4–inch round cutter. Place the circles of dough on a parchment-lined baking sheet. Work the pine nut mixture between your fingers, creating a thin disk about the size of a dime. Place the circle on a cut-out cookie and garnish with fresh rosemary sprigs, about three leaves for each cookie. Once all of the cookies are finished and garnished, bake them for about 15 minutes until they are golden brown. Cool on a wire rack.

To prepare the caramel sauce, heat the cream and vanilla in a medium saucepan over medium heat until simmering. Add the butter, turn off the heat, and set aside. In a large heavy-bottomed saucepan, combine the sugar, corn syrup, and water. Cook over medium-high heat, swirling the pan just slightly to gauge the caramelization, until the sugar becomes a medium amber color, about 10 minutes. Remove the caramel from heat and carefully whisk the cream mixture into the caramel. Be very careful—the caramel will steam and bubble. Whisk to combine. Place the pan in a large bowl of ice water to cool.

To serve, whip the whipping cream in a chilled medium bowl until it begins to thicken. Add the crème fraiche and beat until thick and fluffy. Spoon 1 tablespoon of the warm caramel sauce onto each budino, sprinkle with 1/8 teaspoon of fleur de sel, and add a dollop of whipped cream. Serve with a few cookies on the side

6 Comments